Emily Grace Theme
Frequently Asked Questions
Thank you for purchasing our theme! This page is meant as a quick reference guide for the most commonly asked questions. For more advanced theme set-up instructions, please refer to the theme tutorial. This page will be updated regularly based on customer feedback.
General Theme Questions
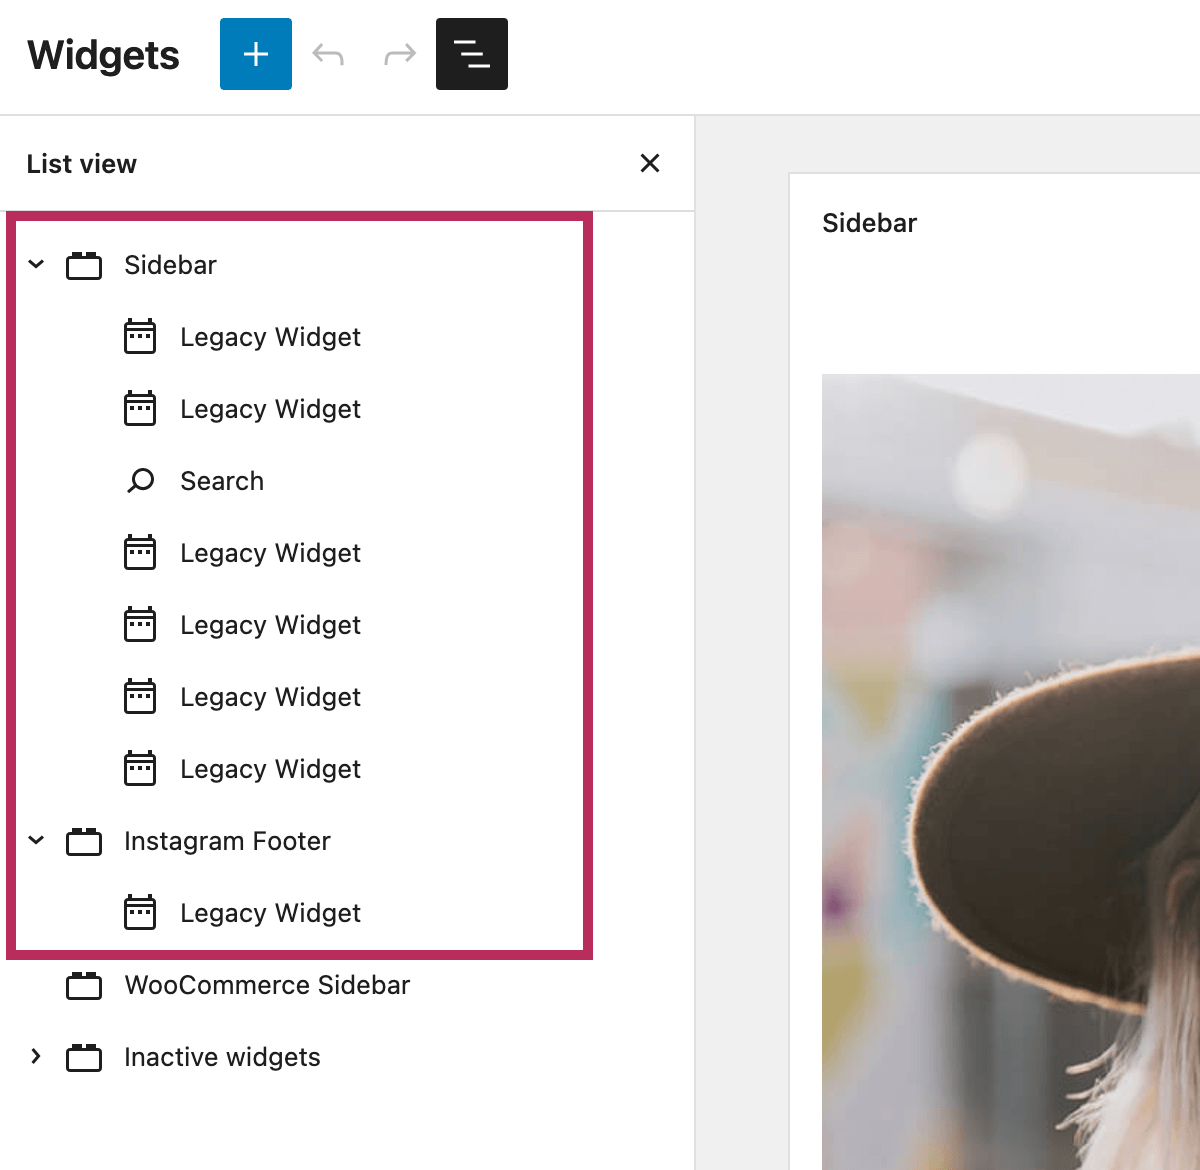
If you are using a new WordPress website, WordPress will automatically add default widgets to the sidebar and footer of your website. If you see the categories or archives data listed at the bottom of your website, this is what is happening.
To edit the the Sidebar and Footer of your website, navigate to Appearance > Widgets. As shown in the screenshow below, click on the List view icon in the top, left of the screen.
Review the list of items under the Sidebar and Instagram Footer sections. To remove any widget or group from your website, click on the 3 ellipses, and select Remove from the dropdown menu.
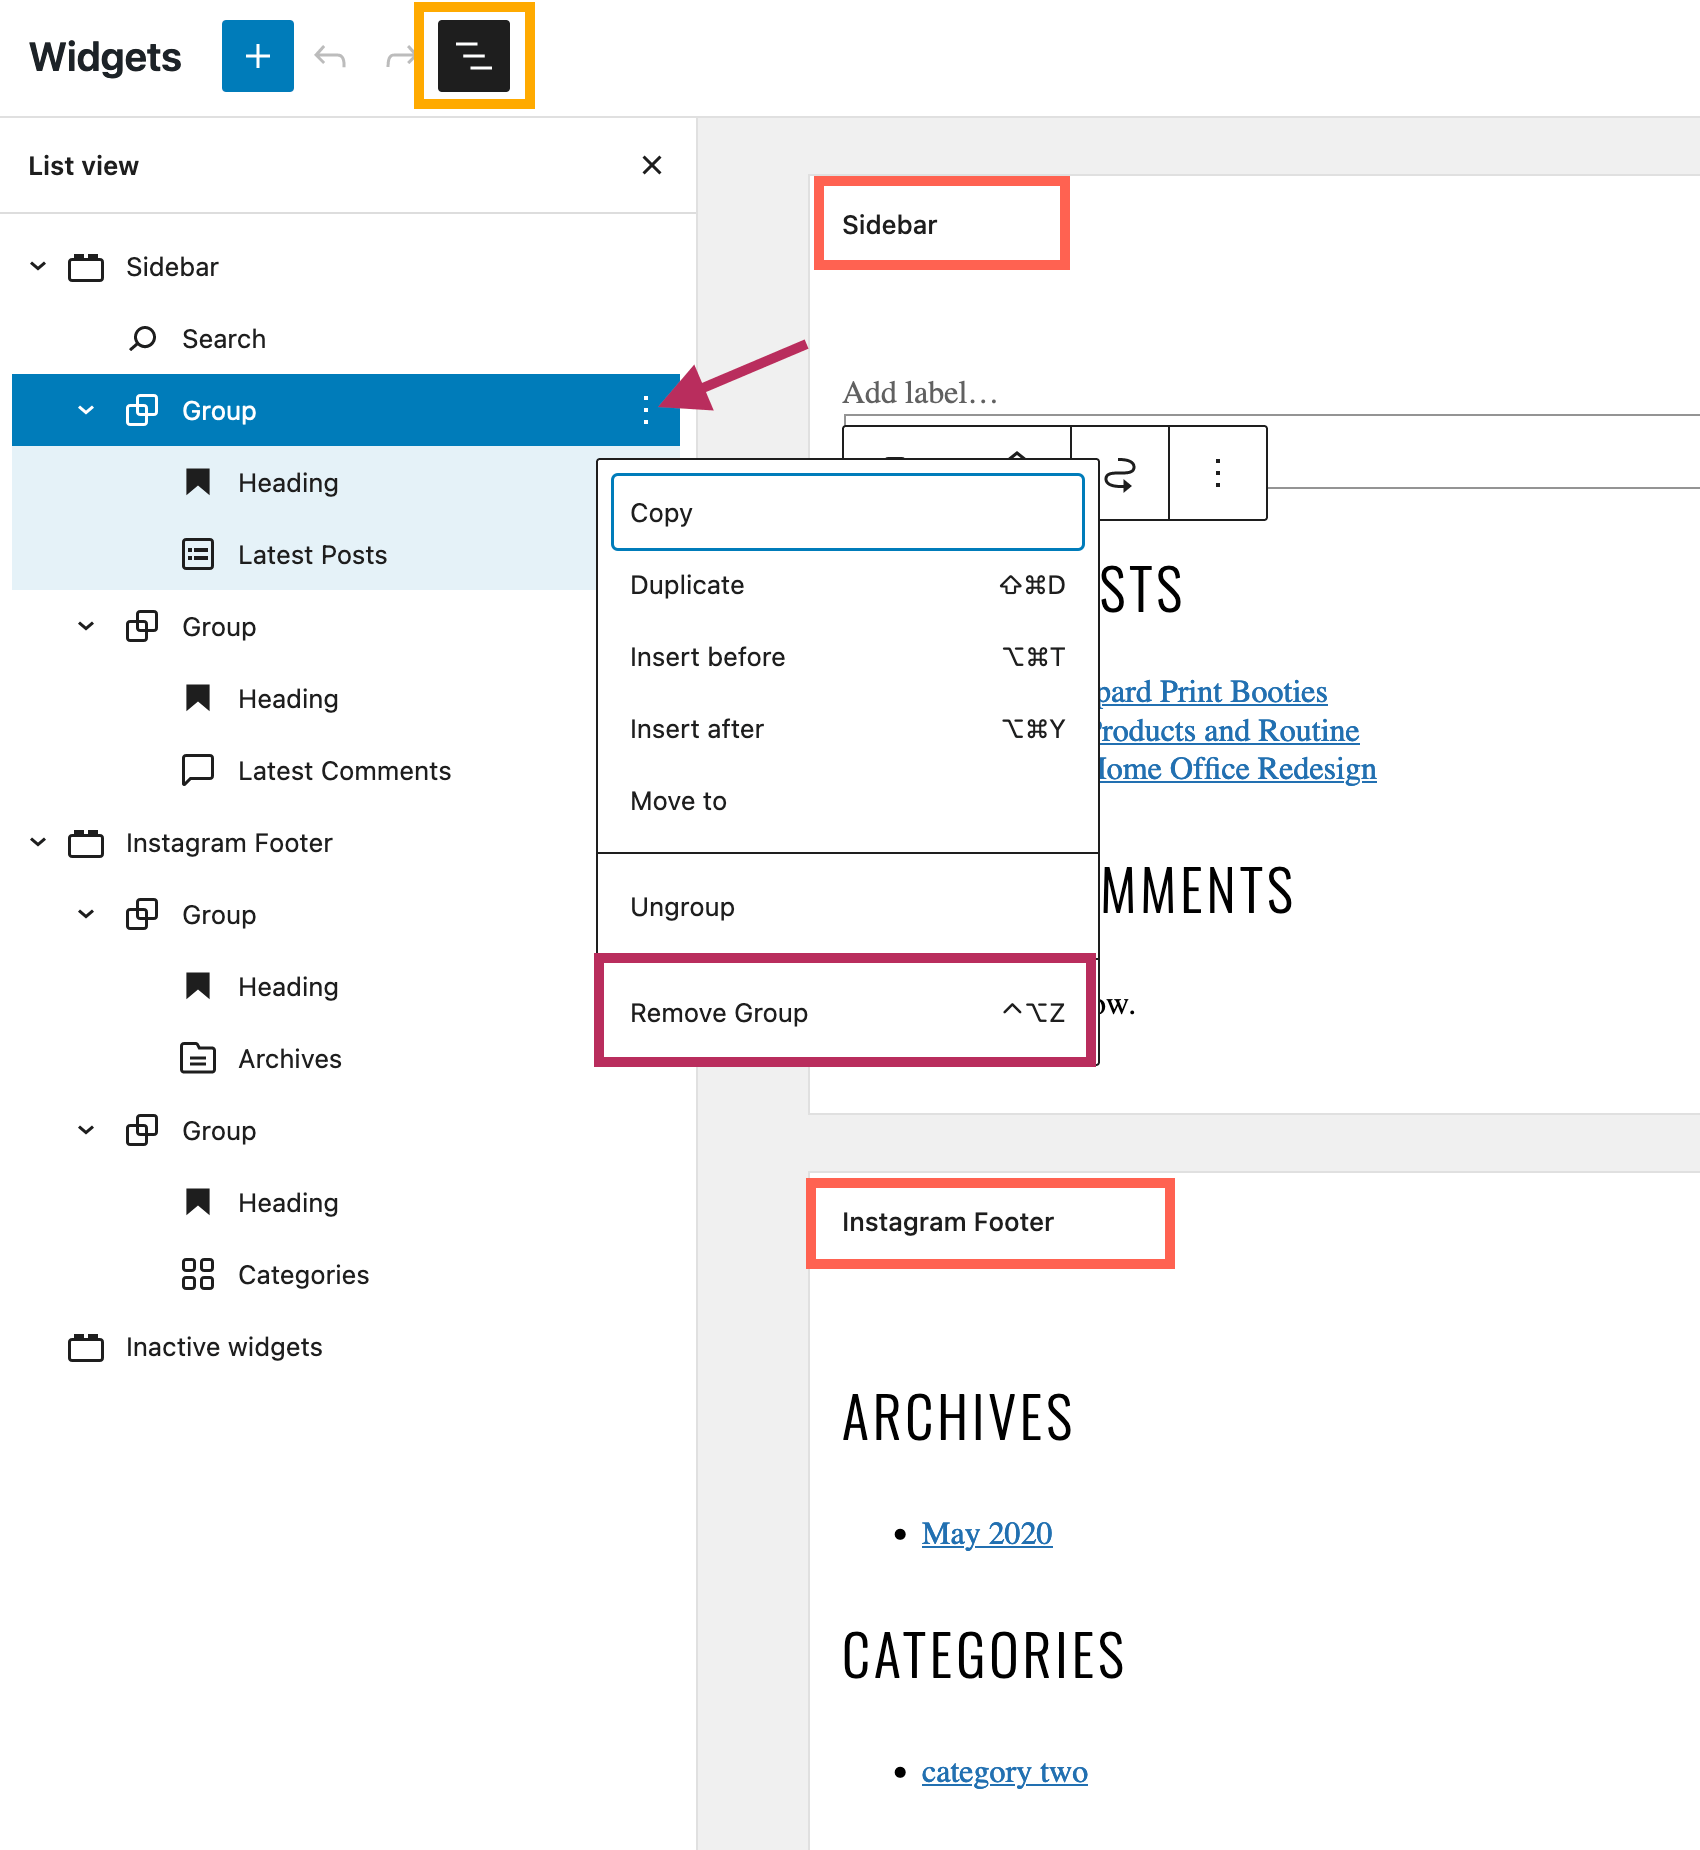
The screenshot below shows the Sidebar and Instagram Footer sections from the theme demo, with just the theme widgets included in each section.
The most common cause of this problem is a mismatch between your website URL (https://emilygrace.pixandhue.com) and your WordPress settings. In most cases, if you have added the SSL certificate to your website, you need to update your WordPress URL settings to match.
To review your WordPress URL settings, please navigate to Settings > General. As shown in the screenshot below, there is a mismatch between the demo URL (starting HTTPS) and the WordPress settings (starting HTTP instead).
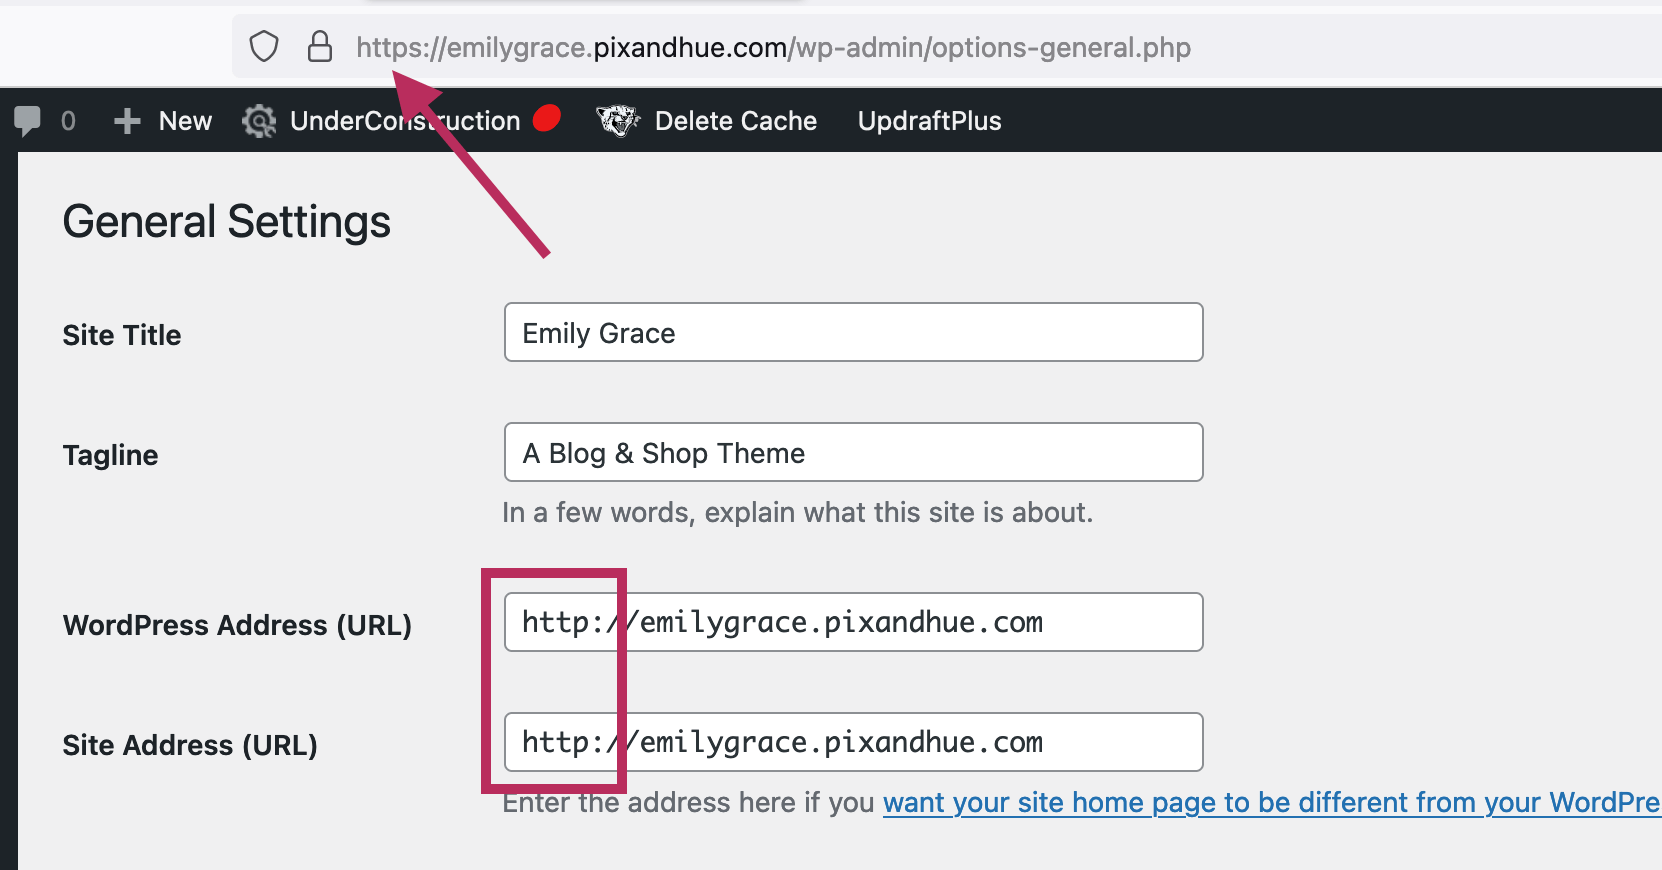
If this is happening on your site, please update the WordPress Address (URL) and Site Address (URL) settings to match your actual website address (from HTTP to HTTPS). As needed, please reach out to your hosting service for assistance with updating your WordPress URL settings.
Important note: After updating your WordPress URL settings, please re-select the font files from your Media Library in the WordPress Customizer settings. They will now display at the correct web address, beginning HTTPS.
Yes! The theme is translation-ready, and you can translate all of the English words in the theme. I recommend using the free Loco Translate plugin to translate your website.
WordPress automatically generates an archive page for every blog category, like this category page from the theme demo.
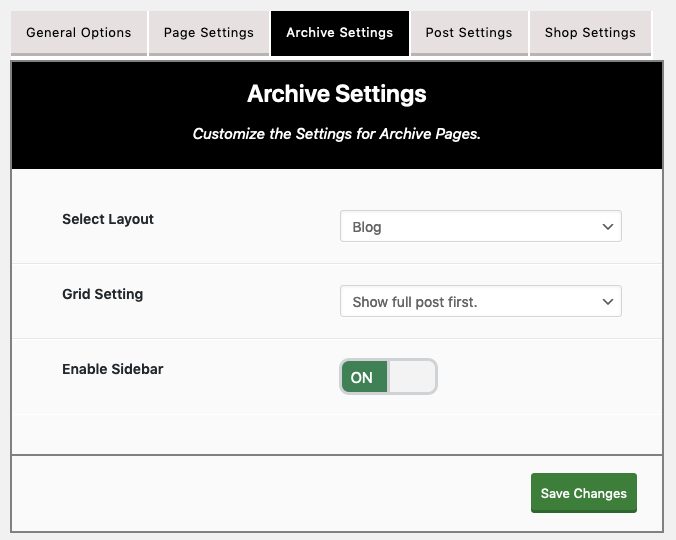
To change the layout of WordPress category pages (and all WordPress archive pages), navgiate to Appearance > Emily Grace Options and click on the Archive Settings tab. As shown in the screenshot below, select from any of the theme blog layouts and update all options for the archive pages. When you are finished, please ensure you click the Save Changes button to save all changes.
There is an optional child theme that is included with your purchase. No, you do not need to use this. If you are editing any source code, the WordPress best practice is to make all coding changes within the child theme. This preserves the parent theme so that your changes are not lost when updating the theme. If you are not editing any source code, you do not need to use the child theme.
If you do wish to use the child theme - it can be installed in exactly the same way as the parent theme, please visit the theme tutorial installation section for detailed help with installing WordPress themes.
Demo Import
The One Click Demo Import plugin will work with most websites and hosting services, but not all. If you click the blue "Import Demo" button, and the import does not finish within a few minutes -- unfortunately, this plugin will not work for your website.
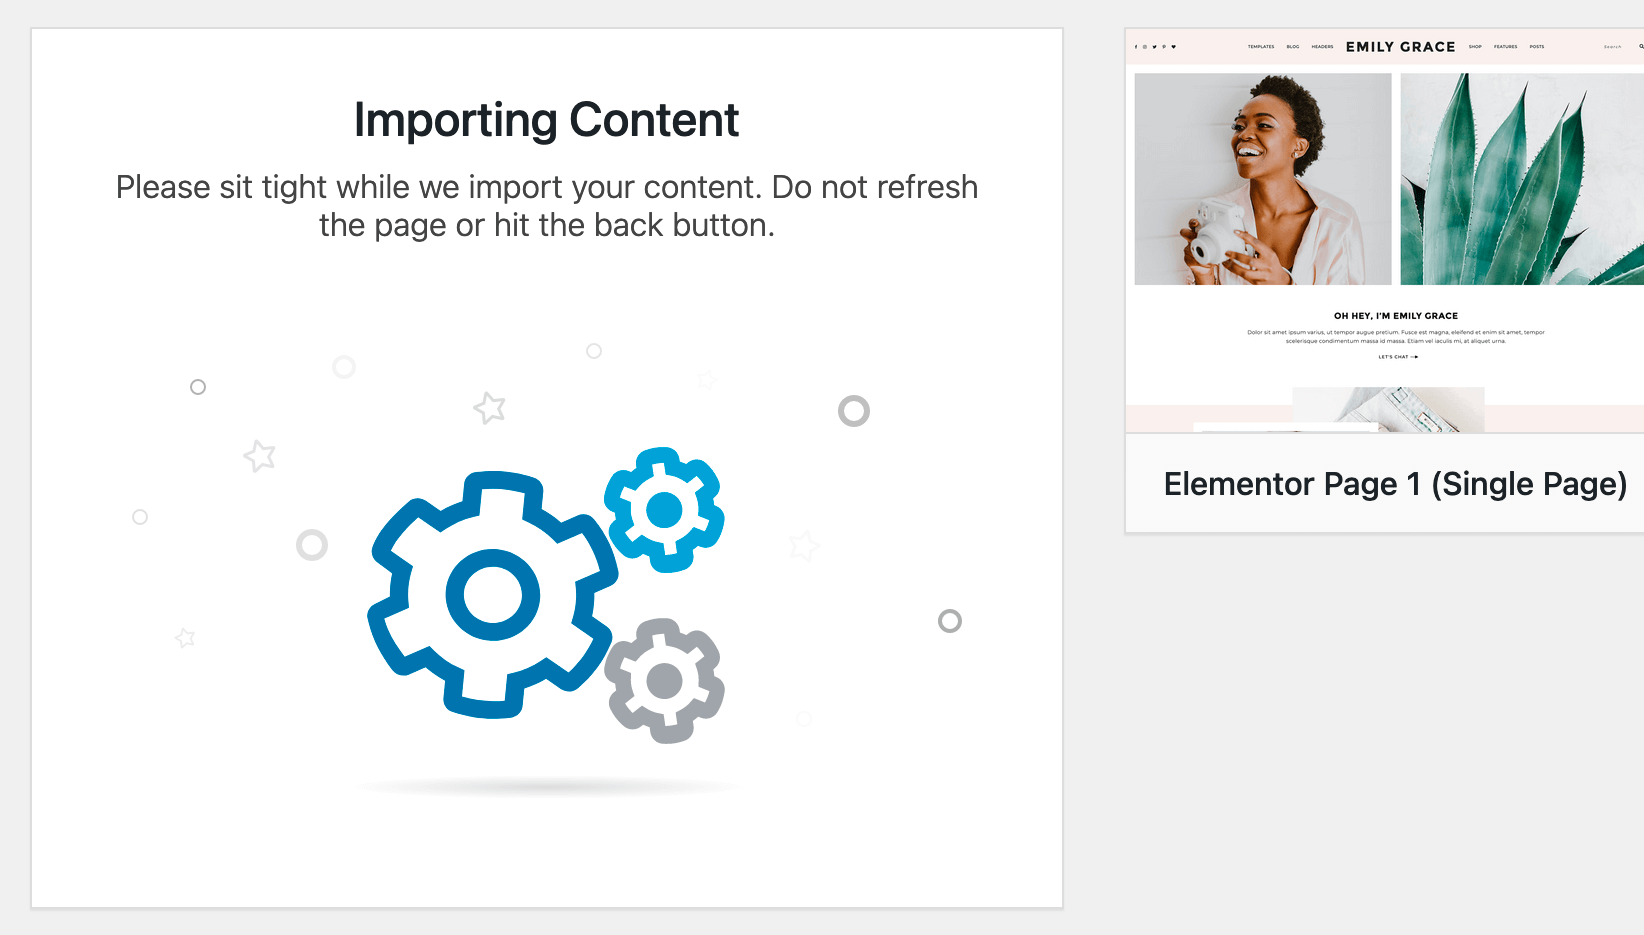
Set your clock. If after 5 minutes, you still see the screen below, I recommend manually importing the files with the WordPress Importer plugin instead. If you visit the Demo Import section of the theme tutorial, please refer to Import Option #2 - WordPress Importer Plugin (Video) for detailed instructions.
The One Click Demo Import plugin will work with most websites and hosting services, but not all. If you see a 403 Forbidden error -- unfortunately, this plugin will not work for your website.
I recommend manually importing the files with the WordPress Importer plugin instead. If you visit the Demo Import section of the theme tutorial, please refer to Import Option #2 - WordPress Importer Plugin (Video) for detailed instructions.
Depending on your website configuration or hosting service, your website may not allow the demo images to be imported. If so, you will see the nofications as shown in the screenshot below - failed to import media.

In this case, everything about the import process worked -- you just did not get a copy of the demo image files in your Media Library. All of the Elementor pages and demo content can still be used in exactly the same way. The demo images are meant as placeholders, and are supposed to be replaced with your actual content.
Additionally, please feel free to email support, I am happy to provide a copy of the desired image files!
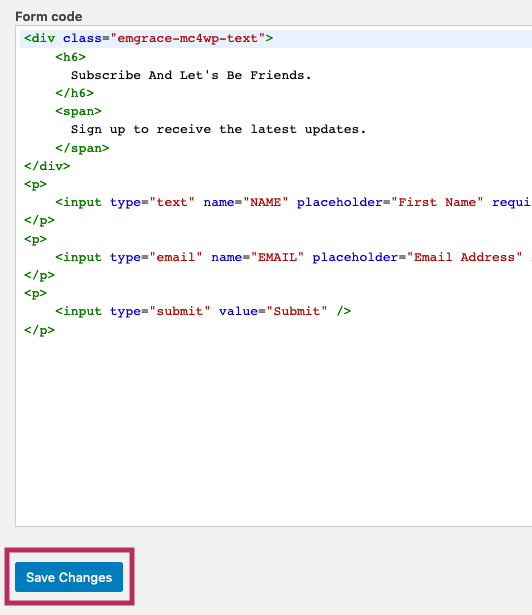
After importing demo content that contains the MC4WP Subscription Form, from the WordPress Dashboard, navigate to MC4WP > Form. As shown in the screenshot below, the Form code section should include the default code that comes from the theme. If the default theme code is there, simply click Save Changes to save the form and finalize its import to your website.
If the default theme code is not present in the Form code section, you can get a copy of the form code from the Subscribe Form section of the tutorial. After you have finished finalizing the form, click the Save Changes button at the bottom of the screen.
After importing the demo content, you must configure the Instagram widget with your own Instagram credentials. To configure the Instagram plugin, from the WordPress Dashboard, navigate to the Instagram Widget section. For advanced assistance with connecting your Instagram account to the plugin, visit the Instagram section of the tutorial.
Elementor Page Templates
Are you trying to edit a WordPress blog page like this with Elementor? If so, that is why you are seeing this error message.
The Elementor Page Builder plugin is meant for static, single landing pages like the home page or about page of a website. In contrast, a WordPress blog page supports pagination (next page / previous page), which allows you to page back and forth between multiple pages (of posts). Therefore, the Elementor Page Builder plugin does not work with standard WordPress blog pages.
There are two ways to display blog posts:
WordPress blog page - all changes in the WordPress editorYou do not need Elementor to create the blog pages included with the theme. To create a blog page, exit to the regular WordPress editor, and follow the steps in this section of the theme tutorial - Blog Layouts.
Mix Blog Posts with other Content + Edit with ElementorIf want to create a page with blog posts and other content, and you want to edit the page directly in Elementor - you will need to use an Elementor page. With the theme, I have included Elementor Page Five (view here) as a template to include both blog posts and other items on the same page. Using the "View All Posts" button at the bottom of the page, you can link to your standard WordPress blog pages.
Either option works, it just depends on what you are trying to create!
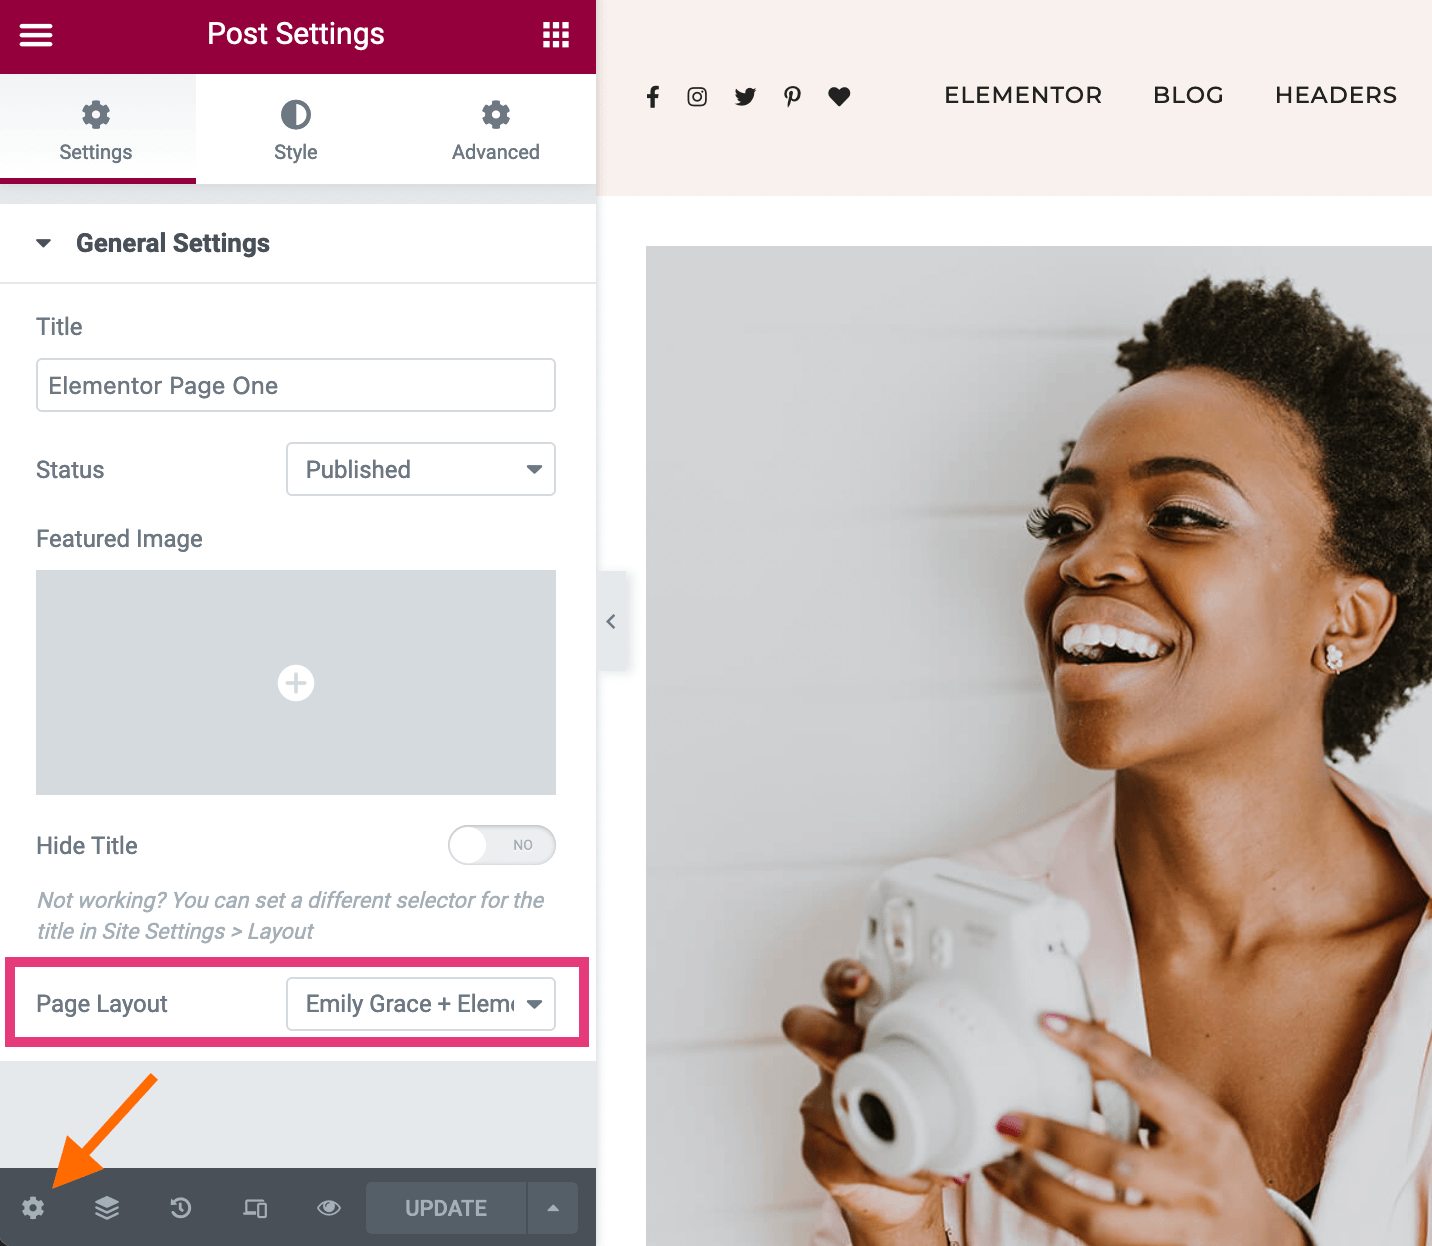
When editing with Elementor, it will occasionally reset the page template back to the Default Template, which includes a sidebar. To remove the sidebar from the page, please click on the gear icon in the bottom, left of the "Edit with Elementor" screen. As shown in the screenshot below - reset the Page Layout to "Emily Grace + Elementor." Click the green Update button to save all changes and reset the page template.
Are you using the Jetpack plugin on your webiste? If so, depending on the plugin settings, this is causing your images to appear differently from the theme demo. To double check your settings, from the WordPress Dashboard, go to Jetpack > Settings and click on the Performance tab as shown below.
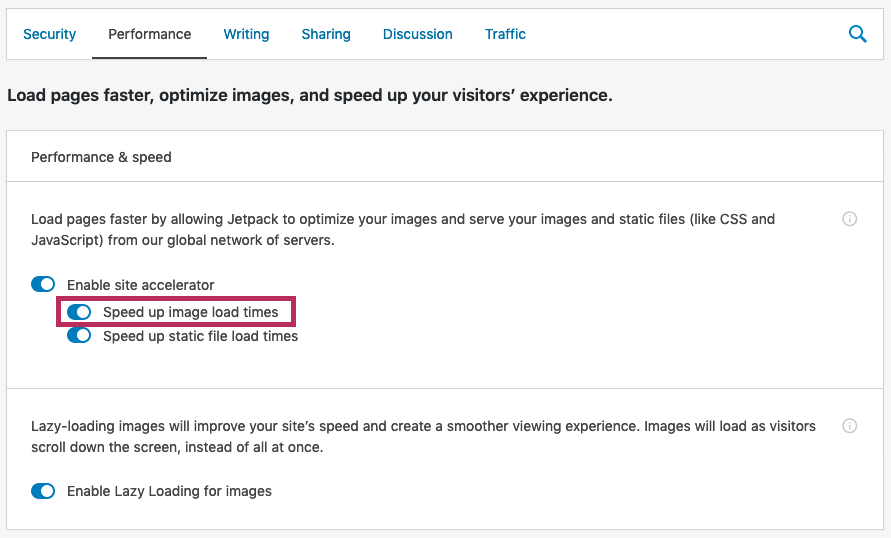
If you have the "Speed up image load times" setting enabled, it causes your website to ignore all of the custom image dimensions entered into Elementor. Please see the screenshot below. Jetpack ignores these custom settings, and uses the acutal aspect ratio of your photo instead.
 Display Images at the Right Size
To resolve the conflict between the Jetpack plugin and the Elementor plugin, there are two possible solutions:
- Option 1 - Turn off the specific image setting ("Speed up image load times") in the Jetpack settings. If you are concerned about page loading times, you can use an image optimization and/or caching plugin.
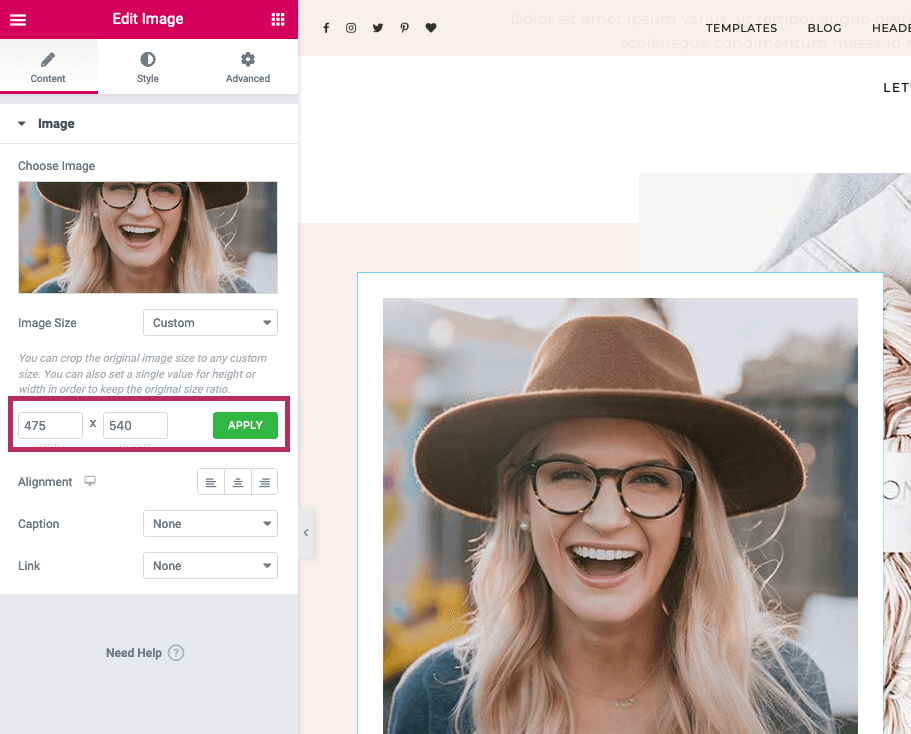
- Option 2 - Use Photoshop or a similar photo-editing software, and manually crop your photos to match the custom image dimensions in the Elementor designs. For example, for the photo above, you would crop the photo to be 475px x 540px and then upload it to the Elementor page.
With the exception of Elementor Page Three, the Services page, and the Contact page, there are theme "Feature Elements" at the top of the page. For example, the demo home page has the theme "Double Images" at the top of the page.
The video tutorials in the Elementor Page Templates section of the theme tutorial demonstrate how to change these images.
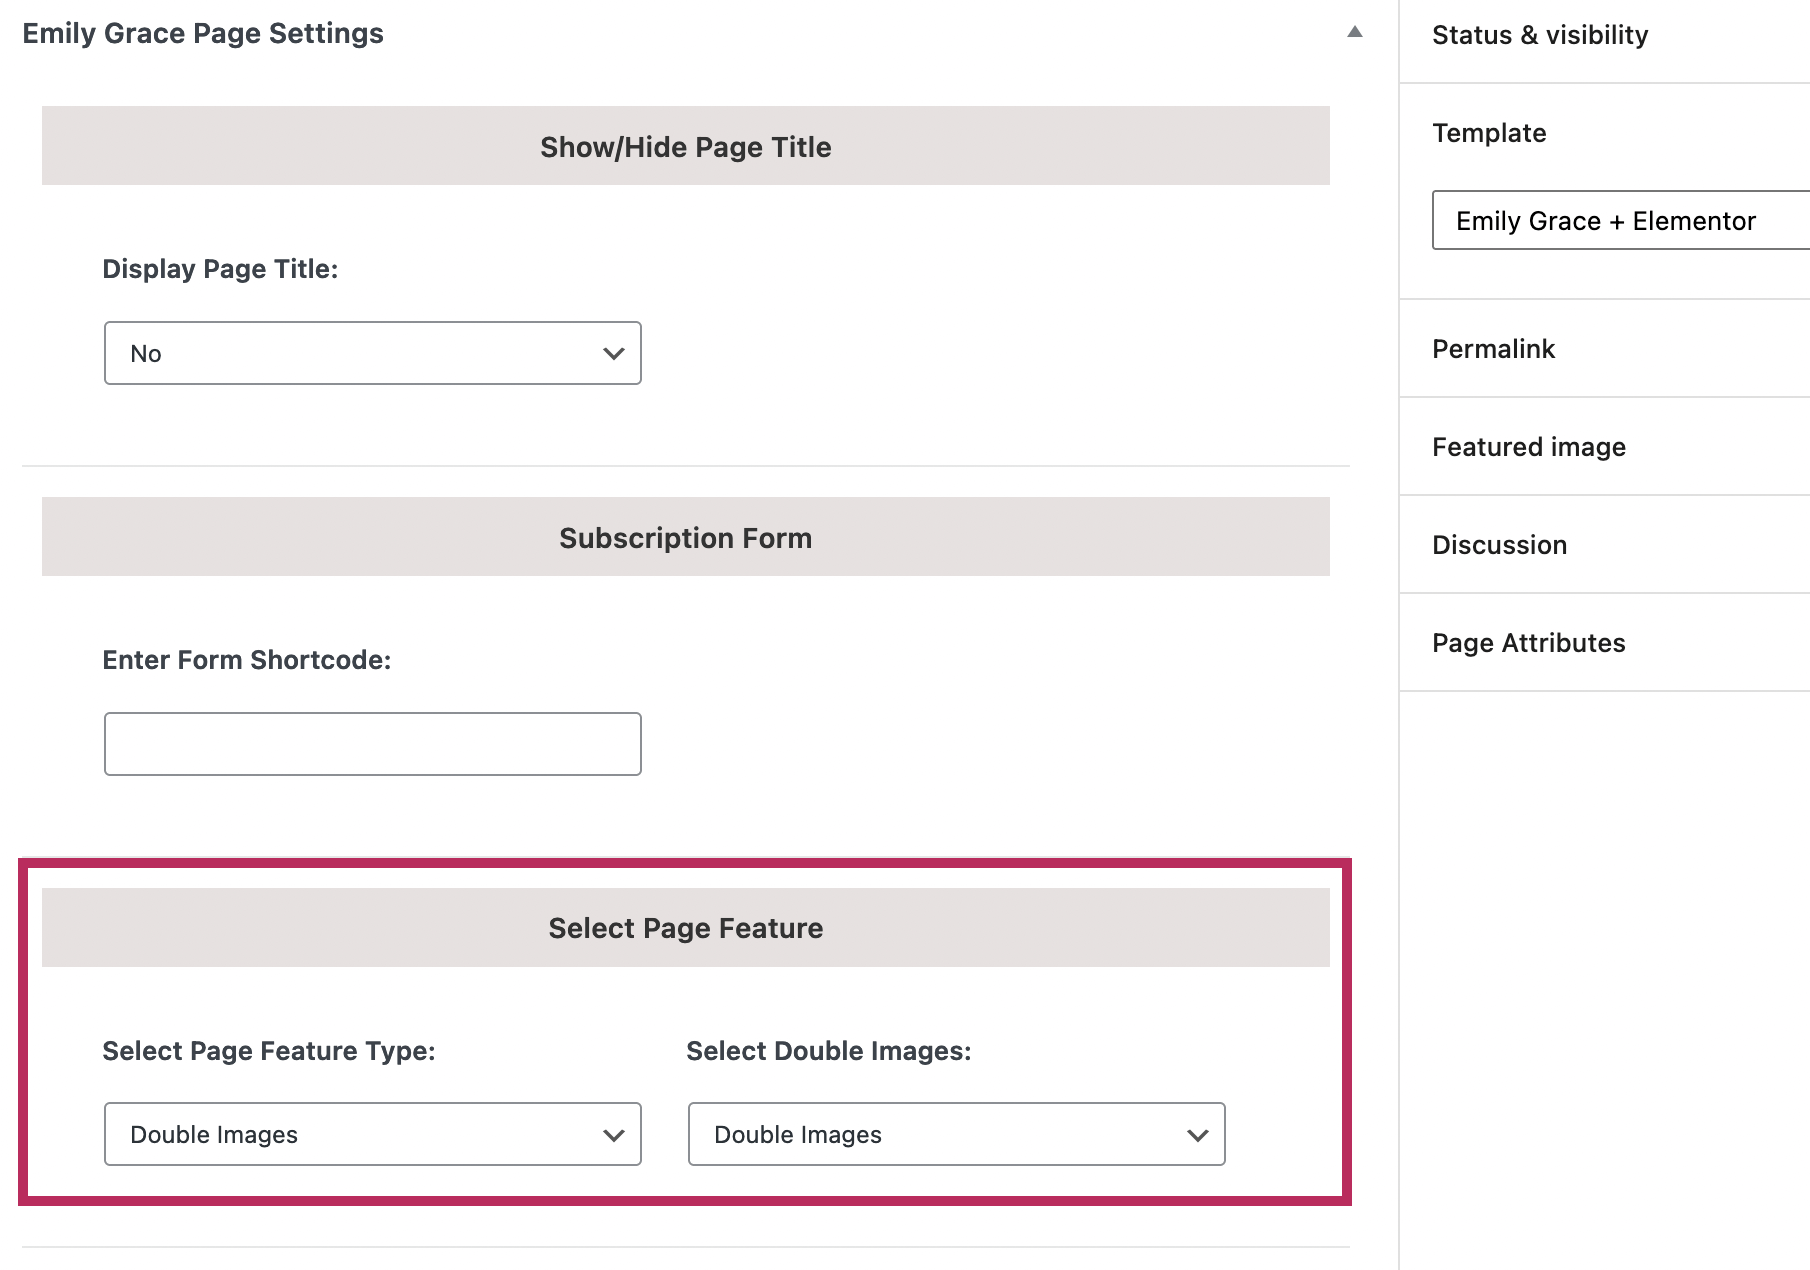
For a quick reference, refer to the screenshots below. Exit to the regular WordPress editor for the page, and locate the Select Page Feature section in the Emily Grace Page Settings. Use the Select Page Feature Type dropdown to make changes to the feature elements at the top of the page.
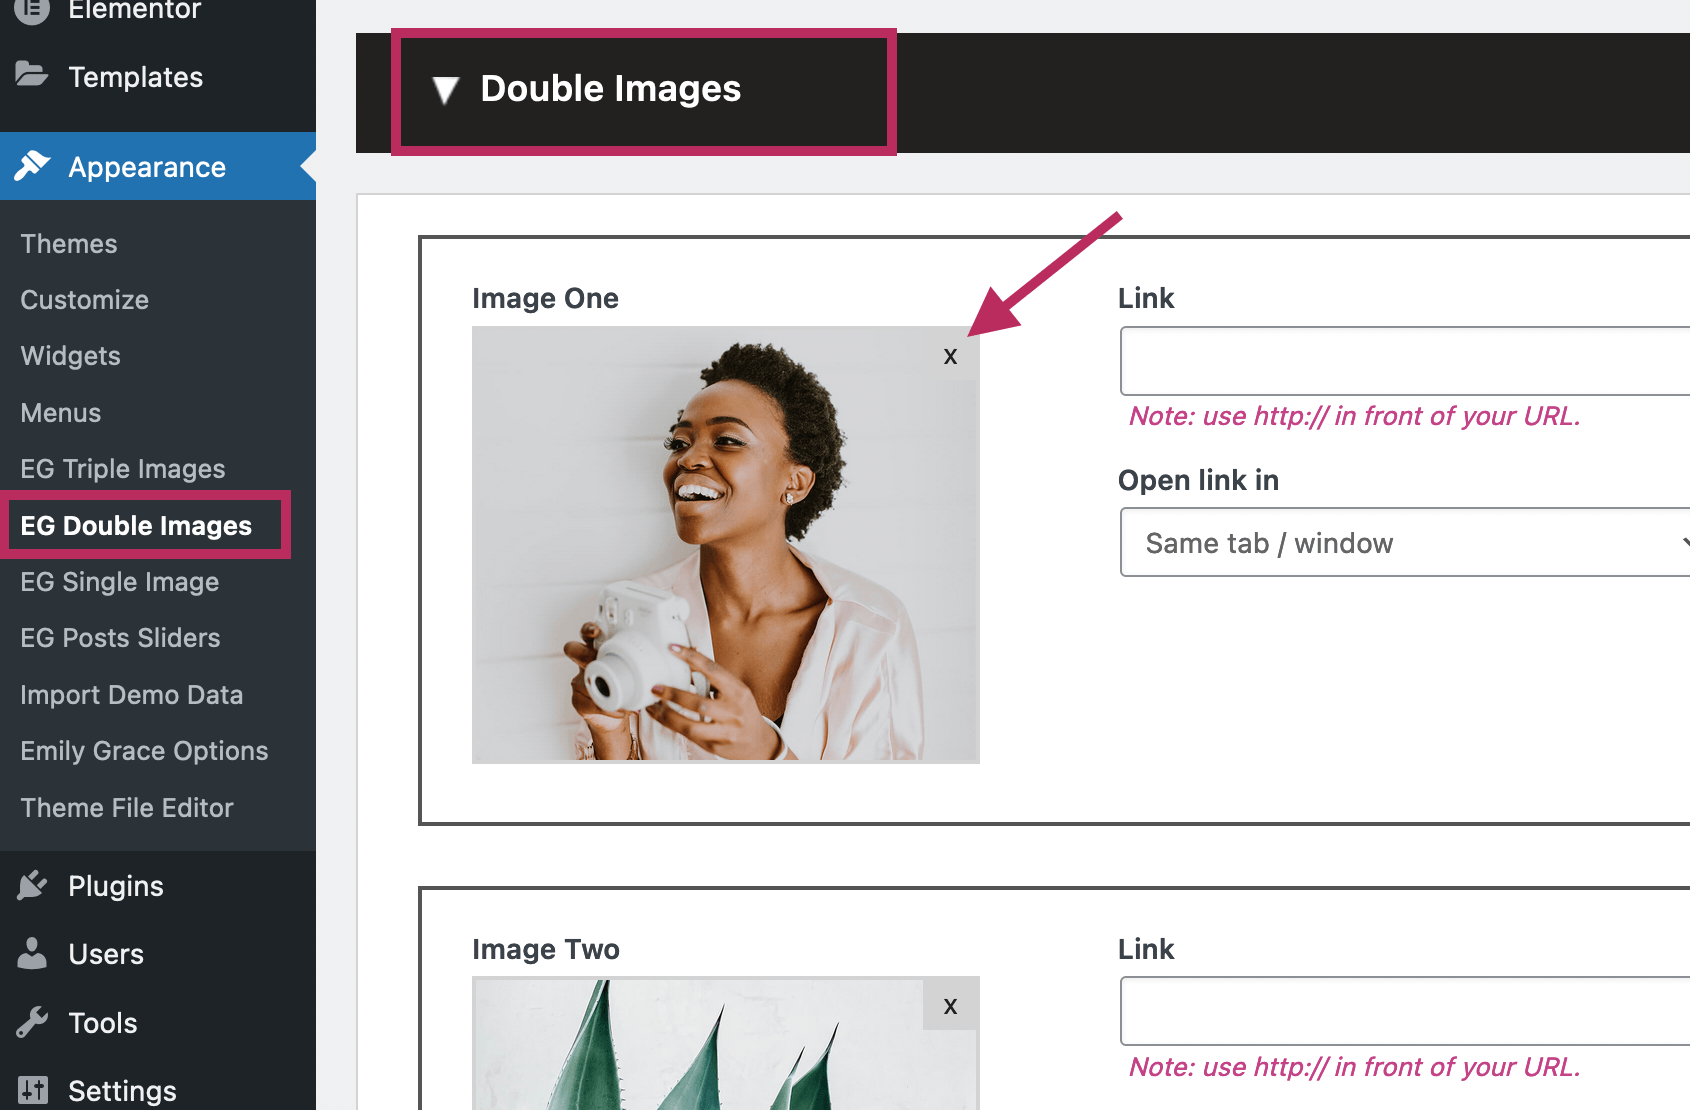
To edit the actual images, navigate to the Appearance section of the Dashboard. In this example, navigate to Appearance > EG Double Images and find the set called "Double Images" as shown in the "Select Double Images" dropdown menu above.
Use the settings to replace the demo content with your own. For example, you can click on the grey X icon to select a new image from your Media Library. Whenever you are finished making changes to the set of Double Images, click the green Update button to save all changes.
Additionally, you can refer to the Featured Images section of the tutorial for more information on how to edit and/or create the theme Feature Elements.
Yes! The Elementor Page Builder plugin has this great feature called the Template Library. It allows you to save an Elementor section (to the library) and then insert the section into any other Elementor page on your website.
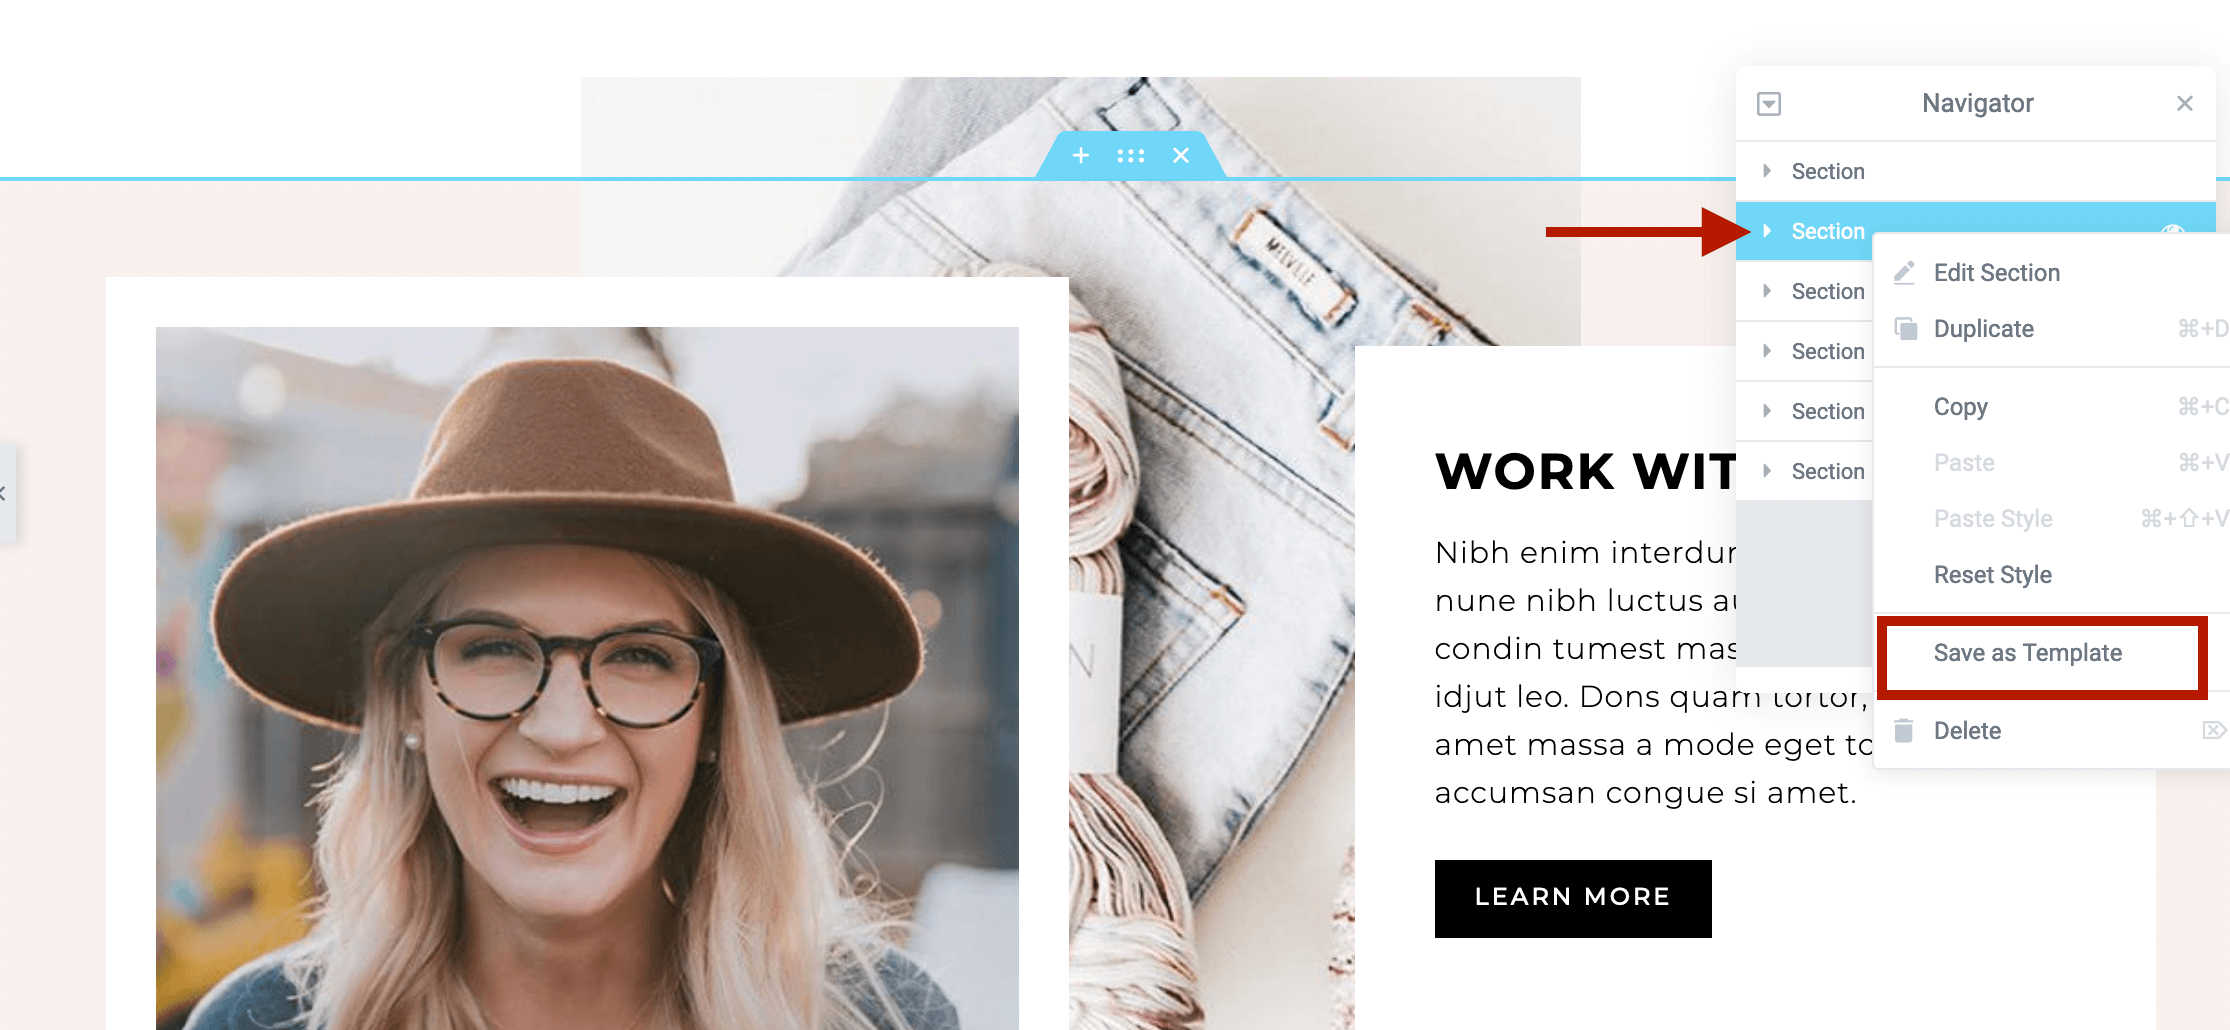
When you are editing inside the Elementor screen, select the top-level section in the Elementor Navigator list. As shown in the screenshot below, right click on the section and select Save as Template in the dropdown list.
On the next screen, give your template a name and click the green Save button to add the section to your Template Library.
To insert the saved template into another page, click on the folder icon in the Add section at the bottom of the page.

The Template Library will appear on your screen. Click on the My Templates tab to view your saved templates. Click the green Insert button to insert the saved template into your page.

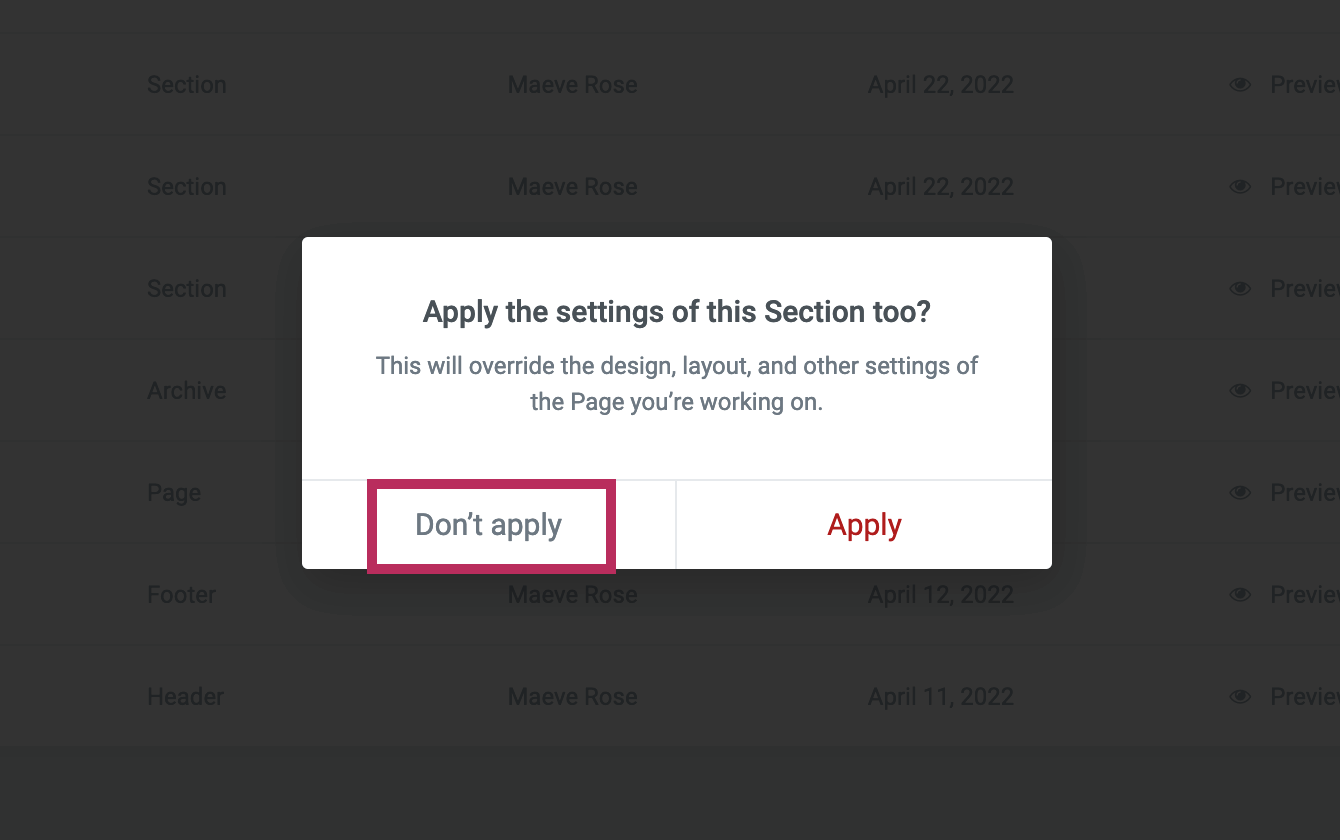
After clicking the Insert button, you will see the Apply the settings of this Section too? pop-up screen as shown in the screenshot below. Make sure you click "Don't apply" when inserting new templates into your page.
Please click the green Update button to save the latest changes to the page.
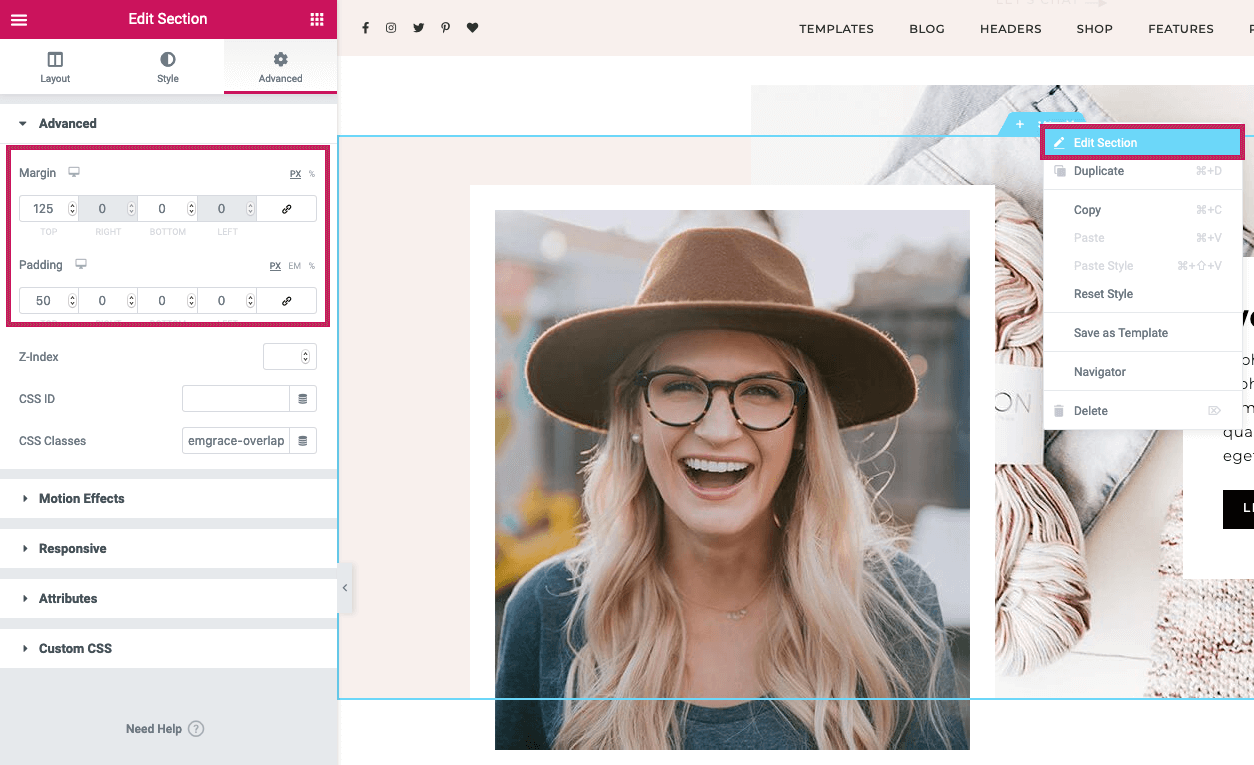
After inserting the template into your page, you may need to adjust the white space above and below the section. To adjust the spacing, right click on the Edit icon and click Edit Section. On the left of the screen, click on the Advanced tab. Use the Margin and Padding values to adjust the spacing above and below the inserted sections.
Additionally, after inserting the new section, you may find that the Elementor plugin resets the page template to the Default template. If your page suddenly shows a sidebar or a large white gap on the right of the screen, this is what happened.
To resolve this issue, click on the gear icon in the bottom, left of the screen. Next, use the Page Layout dropdown menu to reset the page template to "Emily Grace + Elementor." Please refer to FAQ item #2 in this same section above for more details and a helpful screenshot.
Blog Layouts
Are you trying to edit a WordPress blog page like this with Elementor? If so, that is why you are seeing this error message.
The Elementor Page Builder plugin is meant for static, single landing pages like the home page or about page of a website. In contrast, a WordPress blog page supports pagination (next page / previous page), which allows you to page back and forth between multiple pages (of posts). Therefore, the Elementor Page Builder plugin does not work with standard WordPress blog pages.
There are two ways to display blog posts:
WordPress blog page - all changes in the WordPress editorYou do not need Elementor to create the blog pages included with the theme. To create a blog page, exit to the regular WordPress editor, and follow the steps in this section of the theme tutorial - Blog Layouts.
Mix Blog Posts with other Content + Edit with ElementorIf want to create a page with blog posts and other content, and you want to edit the page directly in Elementor - you will need to use an Elementor page. With the theme, I have included Elementor Page Five (view here) as a template to include both blog posts and other items on the same page. Using the "View All Posts" button at the bottom of the page, you can link to your standard WordPress blog pages.
Either option works, it just depends on what you are trying to create!
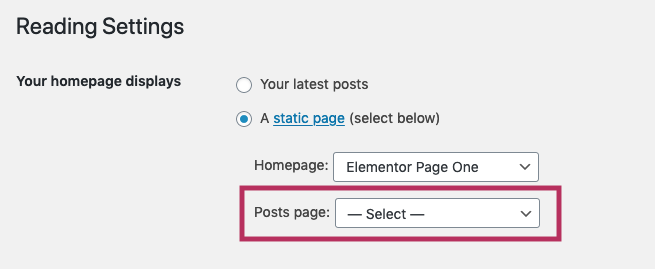
Are you using the WordPress Posts Setting? From the WordPress Dashboard, go to Settings > Reading and check the "Posts page" dropdown menu. As shown in the screenshot below, there should be no page selected.
If you use the "Posts page" setting, it will automatically set the selected page to a Blog Layout page. Additionally, WordPress will ignore all selections from the Emily Grace Page Settings. Therefore, you should not use this option when creating blog pages.
Each WordPress theme uses custom image dimensions to ensure your imagery matches with the design of the theme. WordPress automatically crops your photos according to these custom image dimensions. If you previously had another theme installed on your website, WordPress will continue to use the previous theme's image sizes.
To reset your images to match with your current theme, you can use this free plugin - Regenerate Thumbnails. It will ensure WordPress generates all of the custom image dimensions required for this theme.
Use Larger Image FilesAdditionally, if your images appear blurry, they may be too small to fit the design of the theme. When you are creating blog posts, you should use photos that are at least 1150px wide.
WooCommerce
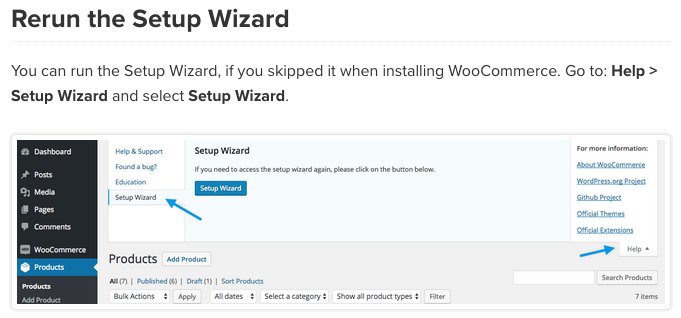
The standard WooCommerce pages are created when you complete the Setup Wizard upon plugin installation. If you did not complete the Setup Wizard initially, you can follow the instructions from the WooCommerce documentation to finish setting up the plugin. Refer to the screenshot below.
Alternatively, you can have WooCommerce generate the standard pages for you. From the WordPress Dashboard, go to WooCommerce > Status and click on the Tools tab. Locate the "Create default WooComemrce pages" option and click the Create pages button.

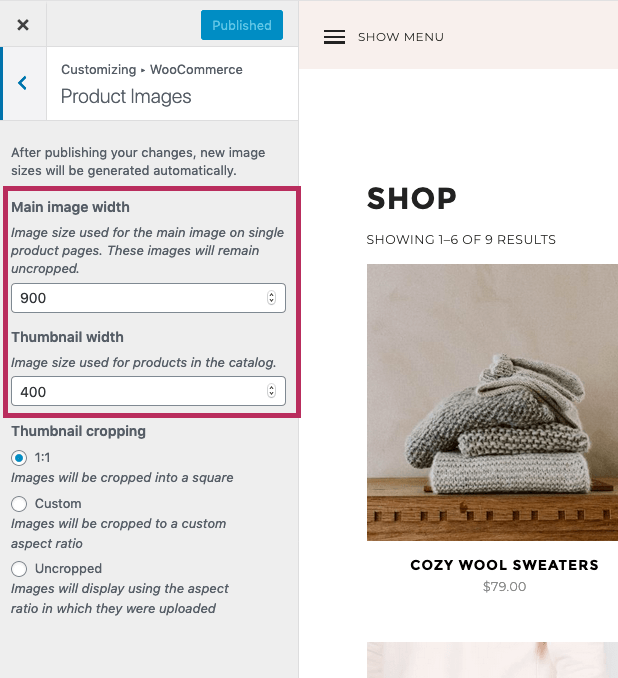
By default, the WooCommerce plugin crops all product photos (Shop page, Single Product page) to a square aspect ratio. Additionally, the default image sizes are too small for the theme design, leading to blurry photos.
To resolve this issue, please navigate to Appearance > Customize and click on the WooCommerce section. Next, click on the Product Images section to configure the settings for all product images.
The screenshot below shows the exact settings from the theme demo. The Main image width should be at least 900 and the Thumbnail width should be at least 400. Depending on your product catalog, you can change the thumbnail cropping to best fit your imagery.
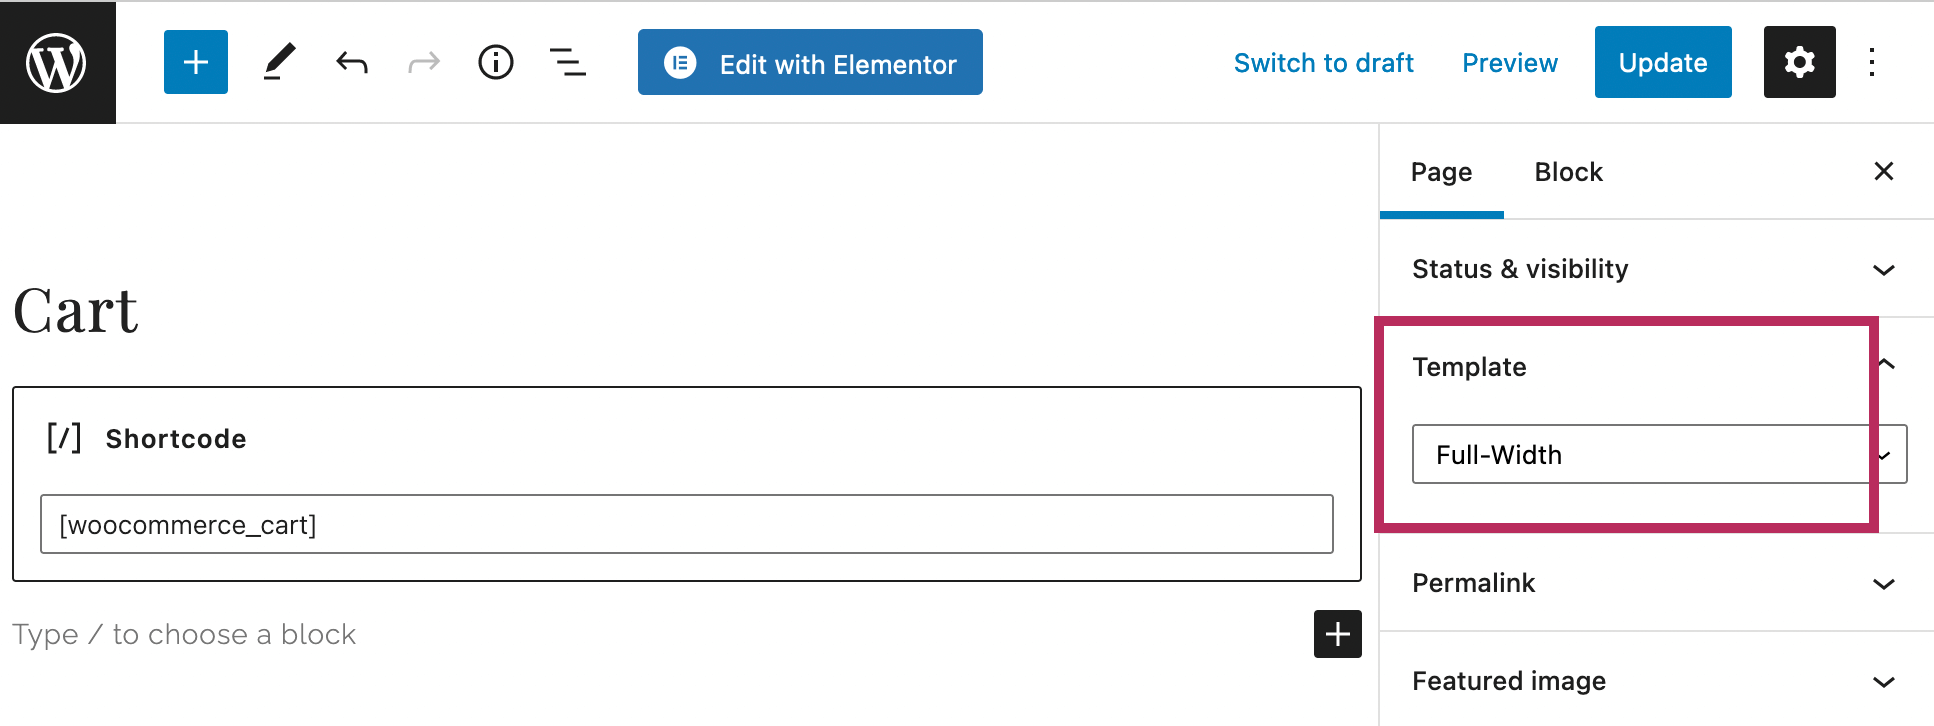
When a new page is created in WordPress, it automatically includes a sidebar with the Default page template. With the WooCommerce Cart, Checkout, and Account pages, you can hide the sidebar by simply changing the selected page template. Within the WordPress page editor, use the Template dropdown menu to select Full-Width to hide the sidebar from the page.
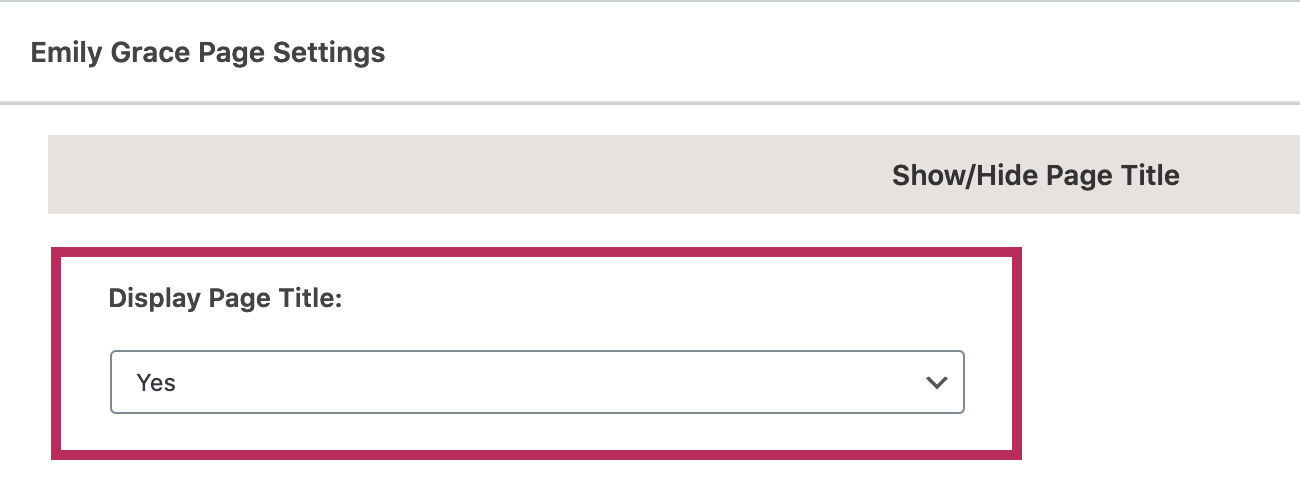
Additionally, as shown in the screenshot below, you can use the Display Page Title option in the Emily Grace Page Settings to show the page title at the top of each WooCommerce page.